Arts and crafts are the kind of things that I always say I enjoy doing, yet never make time to actually do. In the run up to Christy and Gordon's wedding, however, I seemed to find myself (for a whole load of reasons) with a lot of spare time on my hands. So it was that I was able to prepare a couple of sneaky decorations and activities for Christy's "home henny" - an intoxicated tea party with a surprise Breakfast At Tiffany's theme - and to help them in creating some of the adornments for their wedding day.
Here are a few of the things we pulled together..
Painted Mache Items
Perhaps one of the simplest yet effective wedding crafts going, mache letters, boxes and shapes of all sorts and sizes are cheaply available in any good craft store. They provide an ideal surface to paint, glue, cover or decorate with a wide variety of materials. I bought some tiny little "G&C" letters which I painted blue and then glossed over with a starry PVA glue I found in The Works, for something extortionate like £1! The box in the picture above was also painted blue and wrapped in white ribbon, as a vague throw-up to Tiffany's jewellery boxes, while my dad cut a slit in the top so that we could slide in the answer sheets to a wedding predictions quiz, to be opened and giggled at later by the bride and groom! (The blanket in the photo is also a DIY piece, but I must admit it wasn't crocheted with any hen parties in mind.)
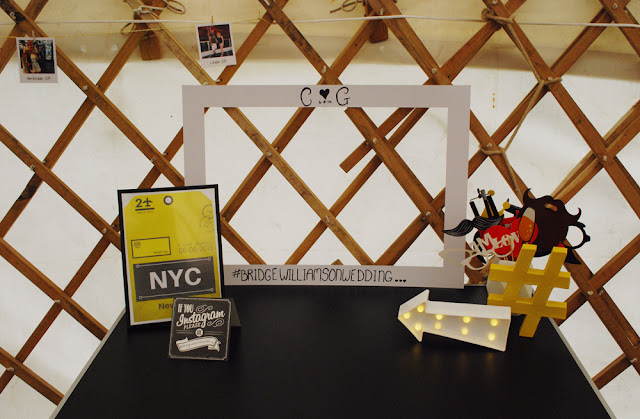
Christy and Gordon also used some larger "G&C" letters, painted silver, to decorate the wedding venue, along with a nice yellow hash-tag which sat at their photo-booth. Which leads me nicely on..
DIY "Photo-booth"
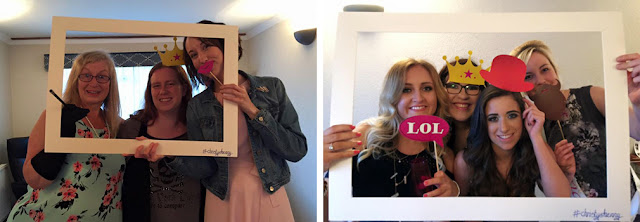
Everyone loves a bit of photo-booth action these days and why bother with the expense of having someone else turn up with a camera and a case full of props when you can do it yourself and have some selfie-based fun? I must confess to purchasing most of the props when I found a bargain-priced kit somewhere, but I had fun raking around charity shops for some Audrey Hepburn-themed items, as well as gluing some false lashes onto a mask to replicate the one worn by Holly Golightly in Breakfast at Tiffany's. (It also doubled up nicely as a blindfold when we played a game of pin-the-bouquet-on-the-bride later in the evening.)
By way of a frame, I picked up a basic picture mount from the frame section at The Range and simply wrote the hash-tag for the hen party in the corner, though it would have been easy enough to decorate more creatively if I'd wanted.
By way of a frame, I picked up a basic picture mount from the frame section at The Range and simply wrote the hash-tag for the hen party in the corner, though it would have been easy enough to decorate more creatively if I'd wanted.
Christy and Gordon recycled some of the props and the frame and used them at their wedding, with a couple of selfie sticks provided to help their guests get snap happy.
Countdown Calendar
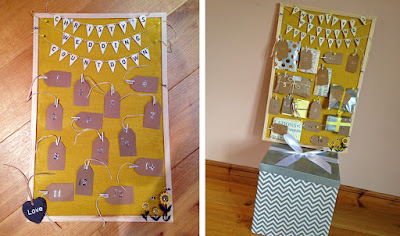
While browsing the internet prior to Christy's first henny in Edinburgh, I came across this idea of creating a wedding countdown calendar for the bride - a little like an advent calendar, with a small gift to be opened behind each number in the days leading up to the wedding.
I picked up a pin board in The Range and covered it in a nice sunflower-yellow paint from a tester pot out of B&Q, before decorating it with some pretty stick-on flowers and a wooden bunting set I found in B&M. Using a stitched-effect font, I printed out the phrase "Christy's wedding countdown" and spent a rather fiddly evening cutting out each individual letter, sticking them to the wooden pendants and threading them all together on a yellow and white twine. My dad spent a lot of time unsuccessfully trying to staple them to the board, but we eventually managed to make them stay, one way or another!
I used brown kraft luggage tags, silver number stickers and some tiny wooden pegs to make the 14 labels for the countdown; and each of Christy's Edinburgh hens - and some additional family members - provided a small gift, wrapped in a silver and yellow theme, to be attached to each one. By the time they'd all been gathered in, I realised there wasn't quite enough space for them all on the board, so I pinned some of the numbers to the board and popped their corresponding packages into a nice silver gift box, ready to be handed over at her home henny.
 |
| Photos by Christy |
Christy seemed delighted with it and I hope the gifts - all manner of sentimental, silly, creative and cute - helped to build the excitement in the run up to the big day.
Origami Cranes
When it came to preparing for the wedding itself, a spot of origami was the first order of the day. I love origami - especially paper cranes - so was delighted when Christy asked me to make some for the ceremony. In a venue with a small and intimate feel, it was important to Gordon and Christy that their guests be seated in a way that allowed everyone a good view and so grey, white and yellow cranes (in keeping with their colour scheme) were labelled with guests' names and left on their allocated seats.
Some leftover cranes were threaded with clear nylon and dangled here and there amongst the lattice work of the yurt which held the reception.
I love the combination of paper cranes and invisible thread and there are so many ways they could be used creatively to decorate a wedding. In traditional Japanese culture 1000 origami cranes were given to wish 1000 years of prosperity and happiness to the new couple!
Chalkboards
Never mind spending a fortune buying chalkboards - it was a couple of cheap canvasses from Home Bargains and a tin of chalkboard paint for these bad boys. Gordon and Christy took care of the messy part, then brought the boards to me for the fun stuff of writing and decorating.
The first board we tackled contained some photography "rules" for the day and Christy and I agonised for ages over how best to word things so that guests would understand their wishes for the day. Eventually, I committed it to chalk under Christy's watchful eye, adding a poor attempt at an Instagram symbol, while mum's writing flowed nicely through a little "Say Cheese!"
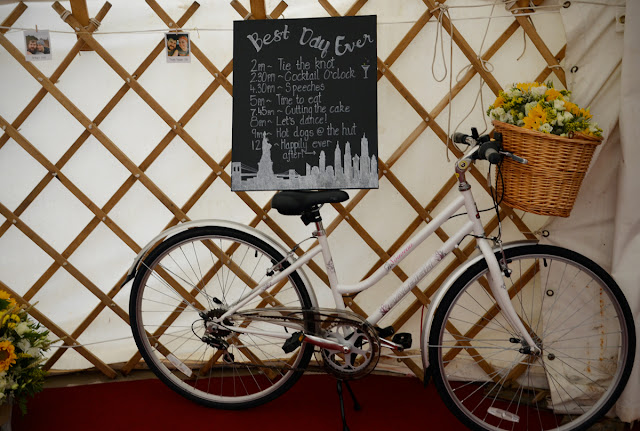
The second board - a planned order of events for the day - was approached with much more trepidation and as far away from any watchful eyes as possible! Tying in with their table plan, etc, I really wanted to decorate this board with a New York theme. There was no way I was going to be able to do that by hand, so instead I printed out a large silhouette of the New York skyline and cut it all out to make my own stencil.
I was very apprehensive about how it would turn out, but it actually looked pretty effective once properly coloured in with chalk pens. The rest of the board was completed free hand using wording Christy and I had previously discussed and I think Gordon and Christy were pleased with it when they came to visit later that day!
I kind of caught the chalk bug and would have gone around chalkboard-ing everything ever, but made do with a final couple of signs showing the way to the smoking area and toilets. The Range stock some sticky-back chalkboard vinyl that provided a handy way to cover the arrow and, as I said, could probably have made a chalkboard out of almost anything!
A4 Canva Prints
Finally, it wouldn't be a blogger's wedding if there wasn't something internet-made!
I'm a bit obsessed with a website called Canva, which allows you to create anything from blog headers to C.V.s; posters or flyers to Twitter posts or Tumblr graphics - all for free. In decorating Christy's hen party, I created some simple graphics using Breakfast at Tiffany's quotes, printed them out and framed them using some cheap A4 frames. We recycled one of the frames for a wedding decoration and filled it with another graphic print, this time made to look like a yellow New York luggage tag, personalised with their names and wedding date.
It's such a simple but effective way to round off your theme, whether for a wedding or otherwise.
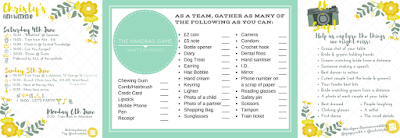
I also used Canva to create photo challenge cards for the wedding tables; games cards for Christy's home henny; and a printed itinerary for our girly weekend in Edinburgh, and I really can't recommend the website highly enough!
Gordon and Christy also made a large white arrow pointing the way to the yurt; a "family tree" with photos from each of their parents' and grandparents' weddings; table names and "bunting" with photos of themselves throughout the years; and their table plan, made from luggage tags and a great big map of New York. They collected all the bottles that held their flowers; used my bike and my mum's as props; and helped my Mamabear to bake and package a couple of hundred vegan and ordinary shortbread pieces!
I think there's really something to be said for making most of your wedding decorations by yourself. It's time consuming, yes, but not only does it save you money, it gives everything a personal touch - unique to the happy couple and much more sentimental to look back on after the day.
By the time the wedding had been and gone, I was at a bit of a loss about how to spend my time without all that crafting going on, but it's definitely inspired me to get more creative and I've found myself picking up both my camera and my crochet hook a lot more recently. Now I'm on the look out for a new project, ready to get stuck in!
xo










0 Comments